
Well it has been a year ( 13 months actually ) and indeed quite a year ... I got this place on May 8'th, 2012 and it is now early June 2013, I have put a ton of work ( and money ) into renovating and I wanted to share some of this transformation. Before I got the place I took a number of pictures which we now can call the 'before' pics ... and tried to take a lot of 'during' pictures as well but since I was working many of these were by others. And although not as diligent as I would have liked to be I did take a fair number of pictures showing each room after I finished the work ... well things are never finished in an old house but these are close to the finished product ... Enjoy.
But before I go on I wanted to offer special thanks to all who gave a helping hand they are too many to mention individually although I would be remiss if I didn`t offer a special thanks to Daniel and Tom and my daughter Laura who have gone way above and beyond the call of duty to help. Without the two of them, indeed everyone that helped, I would still need another year and possibly two or three to get this place to its current condition. And some things would have been impossible to do on my own so I would have ended up paying through the nose for a contractor who may not have done as good a job as Daniel, Tom, Laura and myself .. thanks guys.
Unfortunately with the 'after' pictures you can see very little of the REAL work done on this place because much of it is infrastructure work that takes days and days to complete but is eventually covered up. The during pictures reveal some of this work but it is impossible to capture it alI. I never like to do anything half-assed ... if I'm going to fix a home like this I'm going to do it right so behind the walls is a ton of carpentry, electrical, plumbing, phone system, cable TV system, alarm system ... I even put in 'safe and sound' insulation whereever possible to provide some sound deadening properties. This type of insulation not only helps in the winter but also is fire proof. This home is over a 150 years old so things like fire proofing was important to me. I worked as an electrician many moons ago ( university days ) so I did a top to bottom re-wiring ... also a key safety item. Daniel and I counted all the new lighting and we have replaced and/or added and it came to close to 90 new fixutures ... I really am a mad man. But you don't see much of this work because it is BENEATH the drywall but trust me it is properly done to the highest specifications.
The other thing worth mentioning is that the photos of the 'before' state of the house show it much better than it actually was in reality. To put it bluntly it was a disaster, indeed for the most part it was a shit hole ... not cleaned for at least 3 years, nothing fixed properly, ugly paint, nothing working properly, an incredible amount of clutter, cobwebs, bugs, little electicity, poor plumbing, etc. You name it and it was now right. Virtually the whole house has to be or will eventually be redone. The before pictures actually make it look pretty good ... trust me ... it wasn't. Indeed 'shit hole' may be a compliment to its previous condition.
Following are early pics of the kitchen area:

Clutter was the decorating theme in the place ... I hate clutter!


I was tempted to clean up and keep this old wood cookstove but it wasn't savable and the fire insurance company didn't like it and wanted it removed. Understandable since I have a cedar shake roof. It is now gone.


Following are some DURING pics of the Kitchen renovation ... scary stuff.


Notice the dryrot. In these old homes they poured concrete motar between the joist for insulation and concrete attracts moisture so over the years the studs pretty well all dry rotted away. I replaced the all to the best that I could anyway.


Do you know 'Alex' ... yes the "Alex"trician ... Laura did a lot of the finishing of the wiring ... I taught here the basics and she dived right in ... quite the trooper ... of course she is MY daughter you know!!!


I would fit right in on a street corner in downtown Toronto begging for a living ...nobody put any money in my bowl ... darn!

Me getting ready to spray foam the outside walls ... this stuff can be toxic!


My Daughter Laura ... the 'Alex'trician


Still have to clean the soot off the old chimney ... indeed the chimney is no longer in use and goes up through the master bedroom as well and just takes up space. I was tempted the remove it but then that would lead to work fixing the roof. When I put on the addition this will probably go.


A truck load of IKEA furniture


Since the kitchen is temporary I put in an IKEA kitchen which is all just various units that can be moved or used elsewhere when and if we get permission to put on an addition.


Now I can`t honestly say that any room in this place is DONE but this is the transformed kitchen area. As you could see in the above pictures, we gutted this room down to the bare walls and removed all the old cabinets, re-insulated with safe and sound fire and sound proof insultation, new stud walls around the entire interior, replaced dryrotted studs, all new plumbing, removed the old tile floor which was cold and ugly, new sub-floor, finished with a new composite floor at least until later when I plan to put in three quarter inch maple, new beams to properly support the bedroom upstairs, removed the old wood stove ( ugly and unsafe ) and of course all new electrical and drywall and paint.
When we got the place there was exactly ONE electical circuit besides the stove in the kitchen area. We now have 22 dedicated circuits including 5 split receptables and electrical baseboard heaters. We took out the old woodstove since it was hard to get insurance and it was ugly. We still need a kitchen counter and some more storage space and some shelving installed. I also have to build a cabinet around the new stove ... it never ends. Also this kitchen is temporary since the finished kitchen will go into an addition when and if we get permission to build it. So I put in an Ikea portable kitchen that will make do until we get a proper kitchen. My talented daugther designed this room and did a fantastic job.


Following are the before pictures of the sunroom .... The sunroom had these stupid shutters on the outside and stupid screens on the inside. To open the room you had to get on your hands and knees and first open the screen doors and then open the shutters and secure them to some dumb buttresses outside and then once again close the screen doors. There are eleven windows and each had eight bolt latches that had to be secured. It took about 20 minutes for one person to open or close the room and of course this was all done on your hands and knees. We got rid of it all and replaced them with casement windows that crank open and shut and takes about a minute. Still have to bend over but don't have to get on your hands and knees. The previous system was open to the weather and thus the room was not useable once the weather turned cold other than as a giant walk in freezer. Under fear of rain we had to close it up each night and reopen in the morning which was a royal pain.
The screens were not well built so in the summer it was buggy as well ... a spectacular view and always a breeze back there but the window system made the room almost unusable. Now with any luck we can use it all year round since the floor and ceiling are insulated and I put in double pain windows. There is no way to get furnace heat to this room but I'm hoping a small space heater will do the trick. I may not get 12 months of use but will definitely get more than four months of use.
Notice also that the previous owner had painted grape vines all over the mouldings ... I painted everything except the ceiling white. Indeed the whole house is now painted white on white ... colours might come later but for now I just wanted the clean look of white walls and white mouldings.
The before pics ....


And this is what happened when a sudden rain comes up and you don't have time to close the shutters ... a bloody mess


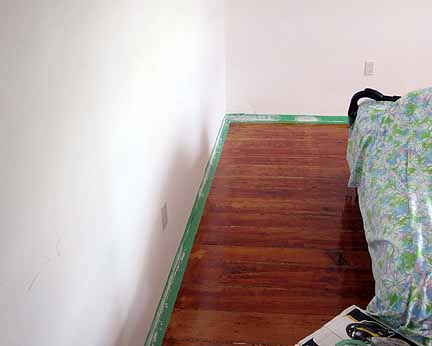
Some during pictures ... not a lot but you get the idea.


The transformed Sunroom ... one of our nicest rooms now.


The library is the only new part of this structure and it was built sometime in the last twenty years. We didn`t do a lot in here except take out the huge and relatively useless clothes closet that just took up space. Once removed the end wall was the original wood siding from the old house and we dryewalled it and then covered it with the same wood that was everywhere else in that room. Luckily we found the identical wood. Laura wants to paint some of these wood walls but I didn`t get to it yet. I did get rid of all the ugly green paint on the mouldings and baseboards and replaced it with flat black ... looks great. This was Daniel's idea and blessed by Laura.
I also put a new composite floor down and this is the one room, besides the bedrooms, that has furniture. Two fantastic chairs from our friends store in Dundas and the rest relatively inexpensive Ikea sofa beds that provides more sleep space for company. I actually have room to sleep about a dozen comfortably if you include all the bedrooms although some would question my definition of "comfortable". I really like this room now. It is square and not too big and with the couches and chairs can sit 6 to 8 easily for entertaining purposes. And because it isn't too big you can actually carry on a conversation with people. I had a dozen in here at Christmas and it worked well and that included a relatively large Chistmas tree.
I also put a big screen TV on the wall. I do NOT have a TV service and don't plan to get one but I do have high speed internet so can watch Netflixs and DVD`s ... at least some electronic entertainment. Notice also the stairs leading up to a loft above the sunroom. Not very practical for any adult but over the past year many a youngster has slept up there ... a great spot for the kids to play and stay out of the hair of the adults. There are two foamies up there and an air mattress so it can sleep 4 young adults easily and more if we are desperate.
The before pics ...


Some during pictures ... a lot more work than it seems but this is arguably the nicest room in the house now.


The Transformed Library ... as you can see not a lot of difference but a much more usuable space ... still a bit cluttered for my liking but much more practical. The two IKEA sofa beds have been used a lot so this was a great idea ... also notice my growing collection of birdhouses on top of the book shelfs. The first time anyone visits I ask that they bring a birdhouse which provides lifetime entry to the property ... the collection is growing rapidly as I have had lots of visitors.


The Living room and dining room. These two rooms are in the main floor of the old stonehouse. I think I'm too good of a photographer as these before pictures make these two rooms look good ... in reality they were awful ... cluttered, dirty, dingy, everything painted yellow and the floors cut up ... ich!!! They had bead board on the ceiling between the beams which we removed and when we took it down we found 'popcorned' drywall which we also removed, we then built a new infrastructure, put in sound and fire insulation and then re-drywalled, properly wired for track lighting and painted the entire room white on white. There will be no `popcorn` ceiling in any place I live in .. trust me. The floor was not savable and we eventually will be putting down three quarter inch maple but for now all I did was put down good one side fir plywood and varathaned it. Just getting rid of the clutter made a huge difference. There was also a wood stove in the fireplace which we removed for insurance purposes and for now just put in a cedar board facing to clean it up .. might put in a propane fireplace insert one day but that is way down the road.
The before pics ... notice all the clutter and the yellow paint everywhere ... 100 percent of the yellow is now GONE as is the bead board ceiling.


Some during pictures ... didn't get many though


Following is the transformed living and dining rooms. No furniture yet but these rooms have a lot of potential and once I get the bath behind the dining room removed and open up that area as well as get the maple floors installed these rooms will be spectacular. I love the windows which are all two feet deep. In at least one of them we will be having a nice thick cushion made and it will be wonderful to curl up in the window on a cold winter day and read a book .. or just day dream. For now I have put some flowers in each window well and have started to move some art in as well ... I have some beautiful glass work that will look good in the windows. This room also will be fantastic for hanging art. The end wall is totally open and there are very large spaces between the windows and doors. I put in trak lighting so we can highlight any art that does end up on the walls and we have a number of pieces to choose from a large collection acquired over the years. Can't wait!!!!
I took out the old wood stove and just covered the opening with cedar ... would like to install a propane insert fireplace sometime in the future but for now I just wanted to close it up and make it look better. Replaced the mantle on the fireplace as well since the old one was falling off.


Notice the trak lighting!

My home office area ... I have fiber optic internet so it is high speed and thus full access to all my files and records at the office in Richmond Hill so will be able to get some work done down there ... getting motivated will be the issue. I'm also taking the extension off this table so that it doesn't overlap the window.


Behind this wall is the master bathroom. We plan on putting on an addition and this bathroom will be moved into the addition ... so will the kitchen and master bedroom. So when complete we will remove the current bath and open up the dining room the full width of the house. This is the reason I've not started to put in the finished maple floor. Because this room will change quite a bit I can't put in the new floor until the addition goes on and the old master bath is removed.


One of three very deep windows ... when the master bath is removed there will be four.

The bedrooms ... not a lot to say here although a lot of work in each ... replaced floors in two of the three. Lined the closets with cedar in the two stonehouse bedrooms, took out the huge and again useless closet in the master bedroom, removed all the wall paper, painted everything white on white, replaced all the electrical fixtures ... etc.
Some before pics

The Master bedroom ... the large closet on the left is now gone ... wasted space, the pink is gone, floors renewed ... they look good in these photos but when examined closely they were beyond saving, indeed under the furniture were large gaping holes.


A better view of the large closet that we removed

The stairs to the master bedroom ... the previous owner was mad about stencils using them all over the place to add things like on the back of these stairs, grape vines in the sunroom, curly cues around windows everywhere, etc .... ugly so I got rid of them all
Following are some pics of the finished master bedroom. There are two serious flaws with this place that can only be fixed with a big new addition out back. One of them relates to this room in that it is impossible to get plumbing up to this room which is upstairs from the kitchen. Now I'm 62 and not having a master bedroom bath is very problematic especially since this room is upstairs .. if on the main floor it would be less of an issue. So this ultimately has to be corrected if I am to retire to this place and the only way to fix it is to put an addition out back.
In the addition we would move the kitchen, the main bath ( the second serious flaw ), the master bedroom and a master bedroom bath. The main bath is in the Stonehouse behind the dining room and entrance is off the kitchen .. YUCK.
But this place is designated historical so getting permission for an addition could be a challenge and will definitely take some time. This then leads to my biggest frustration in that I had to get this place livable which meant dealing with a number of issues like a new kitchen but many things I fixed are in essence only temporary since if and when an addition is approved they will have to be un-done, moved and then the old space re-done with something different .... AND I hate doing work twice and half-assed. For instance, I want to put in three quarter inch maple floors but all the floors will change with the addition so I am stuck putting in composite floors to " make do " until we are in a postion to put in the maple. ... Double the work and no matter how good a composite floor you buy it still looks fake! But I have no choice.
Instead of a cumbersome closet I put in a row of four dressers which you see part of in this picture and a small Ikea unit for hanging stuff ... much more pratical especially since the dressers are up against the back of the house where there is little head room and thus they utilize relatively wasted space since that area has no head room. I also closed off each of the old Stonehouse windows, filled them with safe and sound insulation and put a cedar facing on each. And once again the floor was not savable so I put in good one side fir plywood like in the Stonehouse living and dining area. This is a good example of a temporary fix as mentioned above. There is a good chance that this room will be eliminated once an addition is put in place so I wasn't about to put a few thousand dollars into a real nice floor. I don't particularily like the Fir plywood but it works and will help me avoid wasting money on something that will eventually change radically.


A real good view of the dressers lining the end wall ... these replaced the gigantic closet that was along this wall.


A better picture of the dressers I put into the master bedroom in place of that monstrosity of the closet that was in this area.

There are two old windows between the Stonehouse and the master bedroom which the previous owner had turned into shelving units ... seems like a good idea but they were dark and dirty and not vary practical and on the other side was the middle bedroom and the bathroom in the Stonehouse so a lot of noise travelled through the walls. So I fill them with sound deadening insulation and covered the openings with cedar ... at least now no sound travels betweens the these rooms.
Bun's bedroom is at the front of the Stonehouse ... it took us a full day just to remove the strip of wallpaper that was around the room ... this room was only painted and the closet was lined with cedar. I also cleaned up the floor and put a coat of varnish on it. This was the only room where we kept the original floors. This was the first room we tackled and wasn't very adventuresome in our early stages. They also are not the best and if I had done this room later in the project these floor likely would have been replaced.
I mentioned major flaws earlier. The third big flaw is the simple fact that this place is a story and a half so the upstairs lacks head space as you move to the front and back walls. So another major project will be to dormer the back of the house is we can get it past the heritage committee. Can't do the front of the house since it would fundamentally change the look of the place but they might allow the back of the house to be dormered. This would provide head room in this bedroom, the hall, the bath and the master bedroom. It would also allow me to put in a proper main bath. Right now you can't put in a proper shower because of the lack of head room and have to hold the shower head French style in order to take a shower which is not the best. Also the top of the stairs is very narrow and NOT safe if you are not careful. I live in fear that someone will get up in the middle of the night and fall down the flight of stairs. Dormering would also allow proper windows across the back of the house to let in more light. Here's hoping.
Some before pics ....


Some during pics ... not a lot to show.
Since this house has stone walls and is a 150 years old there is a slight issue with bugs .... so when we complete a room we caulk around the baseboards to seal the room off whereever possible so that there are less bugs. In this old a house you never get rid of all the bugs but now there are very few and pretty much under control.


The refinished floor ... looks good but some of it has been replaced with new wood and then stained and it isn't as nice as in these pictures.


Some after pics of Bun's room ... as mentioned we didn't do much with this room so these are pretty basic.


These are the stairs down to the main floor of the Stonehouse which are now painted white on white .. kept the original wood whereever possible though.
Following are some before pictures of Laura and Vida's room. This room required a lot of work including a new floor. It is the middle bedroom in the Stonehouse ... I put in a new floor, got rid of the shelving unit in the middle .. it was just shelves put into an old window in the Stonehouse and was not workable so I built a new stud wall across that end of the room to add new electrical and sound deadening insulation between it and the master bedroom and the closets were lined with cedar and finally I re-drywalled not all but most of this room. It is also painted white on white.


Some during shots


Don't you just LOVE this old wallpaper ... NOT!!!


Some after pics follow .... although pictures don`t tell the story very well of the transformation of these bedrooms. But before this transformation, this bedroom as well as Bun's bedroom were outright scary to sleep in .. now they are bright and cheerful and clean and no bugs ... well less bugs. I also replaced the window with a casement style which opens to let in lots of air. The prevous window pushed open a crack and it was near impossible to get a breeze at night. In this old a house it is impossible to get heating and or air conditioning upstairs .. heat is no problem because heat rises but cold air falls and it gets warm in the summer. Fans help but don't do a proper job .. at least now we can get a nice breeze through these rooms.


The OFFICIAL opening of Laura and Vida's closet
I haven't done much with the bathrooms yet ... there are two ... one upstairs which I painted, rewired and Laura hung some glass shelves and we replaced some fixtures ... the downstairs bath hasn't been touched except to put in plumbing and electrical for a new stackable washer and dryer. Notice the issue with head space and the need for dormering the back of the house.


I couldn't find many before pictures of the bath upstairs ... follow are some during and after pictures. In these old stonehouses there is no laundry tub in the basement so whenever I have to clean a paint brush etc. I have to use the bathtub upstairs.


That`s all for now ... I also had the propane tank moved from beside the house to out behind my workshop, the furnace replaced, an air conditioner installed ( there wasn`t any air conditioning ), a new security system installed which also protects my workshop, a central vacuum system, almost all new electrical and tons more lights and receptacles, a new soft water system, a new reverse osmosis drinking water system, propane lines run to the workshop for heating and a barbecue and lines run to the front of the house so I also have a barbecue outside the kitchen door ... I could go on and on.
I have one last big item to do before the summer ( put in a new drywall ceiling in the main bath ) and this is a good weekend maybe two weekends of work. And for the rest of the summer I`ll be in my garden or just vegging out. I`m taking all of July and August off so come and visit..... Oh I almost forgot ... I`ve move some of my wine down there as well and I just hate drinking alone. There are lots of beds, great food, wonderful ambiance and of course good company.
Since posting the above pics I've been asked for some pictures of my workshop and they follow ... this space is separate from the house and is quite large ... 20 ft by 40 ft. We wired it, put in proper heating, insulated, central vacuum, proper sub-panel for wiring, four fans in the ceiling to get air movement in both the summer and winter, took out an old useless shelfing unit ( I am using the word a lot with this place since NOTHING the previous owner did was done right ) and installed tons and tons of proper shelving and finally put in a proper garage door, a top notch security system and replaced the slab doors and windows. It is quite the 'man-cave' now.


We had Thanksgiving dinner in my workshop ... easily seated more than 20 people.

An early pic but it shows the size of space I'm working with.
And finally some people pics taken during all this renovating

Tom

Daniel

Lucy

Little sister Bun

Don't know who this fellow is??? but he looks real skinny!

Ashlee
Laura
No comments:
Post a Comment