Before


AFTER


These are two pictures of the almost finished kitchen as of mid-August .... weeks and weeks of work went into this. The following pictures try to capture some of the work in progress .... some are scary.
DURING

My Ikea kitchen in boxes


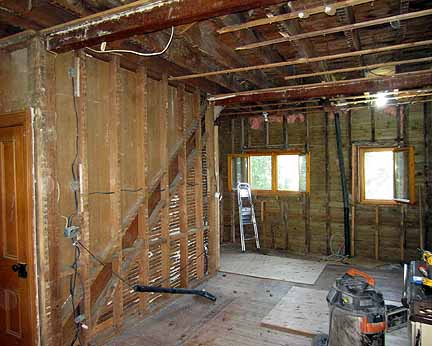
The Tear Down ... we gutted the room .... it started with taking out the stupid island in the middle and then the hutch that was useless and then the cupboard which were even more useless and then .... why not go the whole way and tear out the old plaster ... a 3 or 4 day job turned into a month long complete gut and renovation.


Rotted two by fours


With the exception of this tile floor nothing was done right in this kitchen over the years. And of course the one thing that was done well was this floor which we decided to take out. It took two days of work to smash each individual tile and then lift the sub-floor which was screwed down ... the head of the screws all snapped off so we had to get long bars and lever the sub-floor up .... horrendous work especially in 35 degree heat.


Two old beams held up the second floor and a span of 22 feet ... they were not to code and cracked and the floor above sagged so I replaced them with proper beams ... tres difficult but the structure is now solid ...NOT level but better than what it was ....


We got rid of almost all of the wide mouldings around doors and windows and replaced everything with drywall corners .... a much cleaner and neater look. I kept all this and may find a use for it but NOT in this kitchen.

A lot of building materials to say the least

A 40 YARD DUMPSTER FILLED TO THE BRIM


Everytime someone over the years did something in this room they added a wall so there were actually up to four walls that had to be removed to take it back to the original structure. When we got there we discovered that most of it had rotted away so I built new walls around the entire room. Nothing is square or level but at least they are properly done ...

Back in 1872 when this addition was built the way they insulated was to put cladding on each side of the two by fours and fill the in between with cement. Well cement retains moisture so over the years most of the two by fours disappeared from dry rot. Almost all of this had to be removed and replaced.

THE ORIGINAL 2 BY 4'S NOW GONE FROM DRY ROT


I used almost 50 cans of spray foam to fill cracks and crevices. I wanted to not only seal everything for weather purposes but also to try to make the room more bug proof.


The proper way to but up drywall is sideways ... most don't understand this. I also have 9 and half foot walls so by putting it up sideways it is easier to mud and easier to install.

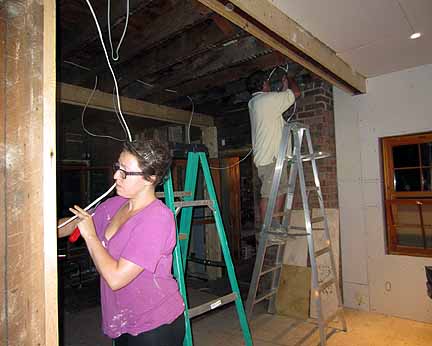
Laura was a real trooper helping me with absolutely everything and eager to learn as much as possible. She loved helping despite how hard the work was over the months.

Notice the drywall corner now on the window instead of the very wide moulding. Less character but much more practical.


My daugther the electrician


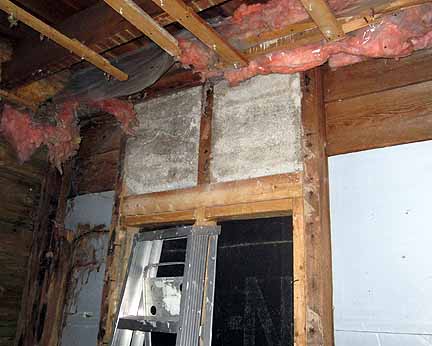
PREPARING TO SPRAY-FOAM THE BACKWALL ...


This do it yourself spray-foam is dangerous to install but man o man does it do the job ... not cheap mind you .... it cost $450 for a kit that did just the one wall but it is very high quality and sure does the job.


THE ORIGINAL KITCHEN HAD ONE AND ONLY ONE CIRCUIT ... THE NEW KITCHEN NOW HAS 19 CIRCUITS ... I PULLED WIRE FOR 10 HOURS ONE DAY.


Proper insulation and proper moisture barrier ... finally ... should make a major difference this winter. Also notice the amount of wire in the ceiling.


Temporary but finally a working sink and dishwasher ... doing dishes in the bathtub upstairs was not the best.


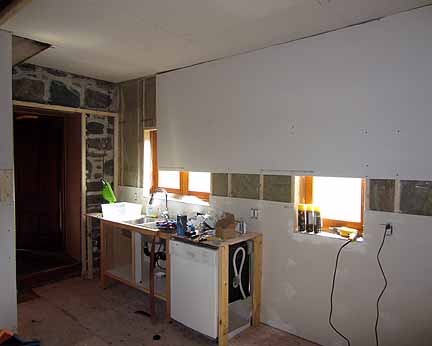


A coat of paint on the room so it now actually looks like a proper room rather than a construction site.


THIS ACTUALLY A 'TEMPORARY' KITCHEN FOR A FEW YEARS and eventially will be removed SO I PUT IN A COMPOSITE FLOOR RATHER THAN THE FLOOR THAT WILL ULTIMATELY GO INTO THE HOUSE ... I PLAN ON installing THREE QUARTER INCH BIRDS-EYE MAPLE ... THIS IS FAKE MAPLE BUT IT DOES THE JOB


I found this stuff difficult to put in ... Laura thinks it was because I had worked 12 hours that day and was dead tired and belligerant from being on my hands and knees all day


I would spend 2 or 3 HOURs in a corner like this ... finicky work and somewhat stressful. Even though this is temorary I wanted to do the work right rather than half assed ... but it takes time.


Laura further bug proofing the gap between the floor and the drywall. Put frog tape on the wall and the floor .... caulk the joint and then immediately remove the frog tape ... creates a good seal and a clean look.


Not a bad looking room if I do say so myself.

I GOT RID OF THE OLD WOOD STOVE ... THE INSURANCE COMPANY DIDN'T LIKE IT, IT WAS FUNCTIONAL BUT OLD AND UGLY AND I HAVE A CEDAR SHAKE ROOF ... NO SENSE TAKING CHANCES WITH BURNING WOOD AND IT IS ALSO A PAIN TO KEEP BRINGING IN WOOD. IT ALSO REALLY OPENED UP THE ROOM. IT TOOK 6 OF US TO LIFT IT OUT TO THE GARAGE AND THAT WAS AFTER TAKING IT APART AND ELIMINATING HALF THE WEIGHT. WE MIGHT PAINT THE CHIMNEY WHICH IS NOW NOT NEEDED.


LAURA ASSEMBLING IKEA CABINETS


I ALSO INSTALLED A CENTRAL VACUUM SYSTEM
Since this is a temporary kitchen we used these IKEA cabinets which are stand alone and can be moved around. We bought three of them .. one to put the sink into, another with drawers for kitchen stuff and another to use as an island. The cabinets Laurs are installing are also IKEA and they will be the pantry. More will be required but they worked out very well.


VIDA TALKED LUCY INTO BUYING THIS CHAIR AND IT FITS PERFECTLY INTO THIS ROOM ... notice how the windows are finished and with the sills at the bottom there is a spot to put things ... there is still the wide moulding around the door but pretty well eliminated everywhere else. I did keep the stone wall to maintain some of the character from the original main house.
I will bring paint fan decks and you can choose some colours.
ReplyDeleteDarren